
Introduction
Today we will learn the fundamentals of programming Discord bot in Python, with the Pycord library.
Requirements
Warning: Strong Python knowledge are required to create a Discord bot. A good understanding of asynchronous programming and API requests is important.
We will use the following tools:
To install Python, you must head to the official website: python.org . Once Python is installed and added to the PATH (environment variables), install Pycord with the following command :
pip install py-cord
If the last command doesn’t work, you can try this one :
python -m pip install py-cord
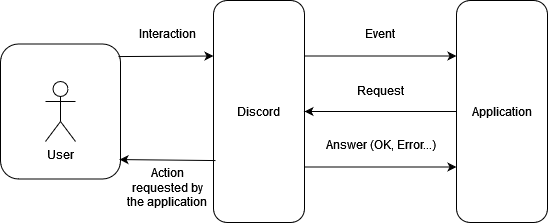
How does a Discord bot work ?
A Discord bot relies on the principle of an API. The bot receive data about user actions from Discord, then runs the corresponding functions and send an instruction to Discord (send a message, give a role…). A user action triggers programmed instructions from our application (in this case, a bot).
Creating the application
A Discord is a Discord application. To create one, head to the Discord developer portal: discord.com/developers .
Also you must configure the “Intents”. There are the permissions granted to our application: read messages, fetch server data…
To invite the bot to a server, you must generate a link (in the “OAuth2” section). You must tick “bot” and “applications.commands”. This will provide the bot the permission to create commands on servers.
This article doesn’t focus on the creation of an application. For more information, see the following ressources :
- Create an application (Article)
- Create an application (Video)
First bot
Instantiating a Client object
First, we will create a bot with only one simple command. To do so, we must instantiate a Client object from the
discord module:
import discord


intents = discord.Intents.default()
client = discord.Client(intents=intents, status="online")
In this code, we declare the same intents as we defined in the developer portal using discord.Intents. This variable
can take multiple value depending on configured intents :
discord.Intents.all(): Grants all intents.discord.Intents.none(): Grants no intents.
If you want to grant certains intents, you must define the corresponding attribute to True. Here is an exemple to
grant access to the message content:
import discord

intents = discord.Intents.default()
intents.message_content = True
The list of all intents attributes can be found here: Official Pycord documentation .
Once the intents are properly defined, we instantiate a Client object. Passing the intents and the status (Online,
Do not disturb…) as parameters. This object will be our bot, its attributes and method will be modified to answer
users actions.
First command
Now let’s configure a “slash command” (a command which prefix is “/”) to greet a user:
@client.slash_command(name="hello", description="Greet a user.")
async def hello(msg, user: str):
    await msg.respond(f"Hello, {user}.")
Here, the @client.slash_command() decorator is used to declare a new slash command and its specifications : name,
description, server restriction…
(see more
).
The decorated function is called when a user compute the declared command. This function uses multiple parameters :
msg: The first argument is always the context on the command. It is used to access to the message author, message content, server and more .utilisateur: str: This argument has the same name as the one the user inputs. It is important to mentions the type of this variable to let Discord know if the user is sending corrects arguments. However, this way of creating command is a bit primitive (we will see a better way).
Running the bot
We can now add this line at the end of the code to run the bot :
client.run(token)
Here, token is the unique ID of the bot. It should never be shared, and can be found in the
developer portal
.
Handling events
It is now time to explore the basics of events handling like :
- Change the bot status message.
- Custom message when a user join/ leave a server.
These events can be accessed with existing methods which can be found in the documentation :
on_ready(): Called at the bot startupon_member_join(member): Called when a user join a server.
Change bot status on startup
Usually, we use the on_ready() function because it is almost called at the bot startup. A useful behavior to define
the bot status. The actual status change is due to the following function:
client.change_presence()
.
@client.event
async def on_ready():
    await client.change_presence(activity=discord.Game("A game"))
This code changes the bot status for “Playing A game” on startup.
Note: It is possible to select other activities like “Listening to …” or “Streaming …”. See the documentation for activities .
Server welcome message
To send a message on member
join, we must use the
on_member_join(member) function to react to the event. We also need a channel to send the message in. Here, we will
gather it from its ID (unique identifier).
@client.event
async def on_member_join(member):
    channel = client.get_channel(CHANNEL_ID)
    await channel.send(f"Welcome to {member.name} on the server.")
Note: This function requires the “Intents.members” to be turned on to be used.
Exercice: Make the bot send a message when a member leave a channel. Here are some helpful ressources :
on_member_remove(member): Function called when a user join a server.Member: Object representating a member of a server.
Commands with advanced parameters
We saw earlier a first way to create command with arguments. Here, we will see how to do it with the @option decorator
and the Option() class. It will be possible to configure what type of parameter the command accepts : variable type,
minimum/ maximum value, optional or not, description…
Both solution are similar, in each case, it is possible to give details about the parameters. It is important to always specify the expected variable type (user, integer, text…).
With the decorator, the parameter name should be passed as first argument. While the class will be used to annotate a parameter. Then not useful to specify the name of the variable.
Using @option
import discord
from discord import option


@client.slash_command(name="gift", description="Gift coins to a user.")
@option("user", type=discord.Member, required=True)
@option("amount", type=int, min_value=10, max_value=100, default=10, description="Amount of coins")
async def gift(msg, user, amount):
    await msg.respond(f"You offered {amount} coins to {user.mention}")
Using Option()
import discord
from discord import Option


@client.slash_command(name="gift", description="Gift coins to a user.")
async def gift(msg,
               user: Option(discord.Member, required=True),
               amount: Option(int, min_value=10, max_value=100, default=10, description="Amount of coins")):
    await msg.respond(f"You offered {amount} coins to {user.mention}")
In both example, the command is taking the required parameter discord.Member corresponding to a member, which is
mandatory (required=True). The default value for the amount parameter is defined to 10, and values between 10 and
100 are valid. You may also want to give a description to a parameter with description="...". The description is
displayed when computing the command in the Discord application.
There are many configuration option to customize a parameter, which you can find in the documentation . A list of valid types for a parameter can also be found.
Both methods are valid and equals, use your favorite!
Note: It is also possible to create predefined parameter from which the user can choose. It is done with the
choices
parameter,
which is a list of choices for the user.
We can even make choice with
OptionChoice
to link a value to a choice (like a dictionary):
@client.slash_command(name="buy", description="Buy a kilo of fruit.")
async def buy(msg,
              fruit: Option(str, required=True, choices=[
                  OptionChoice("Apple", "1.8"),
                  OptionChoice("Banana", "2.25")
              ])):
    await msg.respond(f"The price is {fruit} $")
This is the same thing as:
fruits: dict = {
    "Apple": "1.8",
    "Banana": "2.25"
}


@client.slash_command(name="buy", description="Buy a kilo of fruit.")
async def buy(msg,
               fruit: Option(str, required=True, choices=["Apple", "Banana"])):
    await msg.respond(f"The price is {fruits[fruit]} $")
Managing permissions
Like we did when adding an option, we can restrict the usage of a command to users having the proper permissions with a
decorator,
@has_permissions
.
Here is an example of a command that deletes a given number of messages:
import discord
from discord.ext.commands import has_permissions


@client.slash_command(name="clear", description="Deletes a given number of messages.")
@has_permissions(manage_messages=True)
async def clear(msg,
                number: Option(int, min_value=1, max_value=100, required=True)):
    await msg.channel.purge(limit=number)
    await msg.respond(f"{number} messages deleted.")
Using this command is restricted to user who have the permission to manage messages. The complete list of permissions is here .
Exercice: Create a command to mute a user for a given duration. Restrict the usage of this command to member who have the proper permission. You can use the following ressource :
Permissions.mute_members: The permission associated with muting a user.
Handling Cooldown
An interesting functionality is to lock a command behind a cooldown. A cooldown is manly defined by two variables:
- A time interval
- A number of allowed commands during the time interval
This is the @commands.cooldown(rate, per, type)
decorator that allows this :
rate: How many times the command can be used before triggering the cooldown.per: Duration during which the command cannot be used.type: Thecooldowntype.
Here is an example of a command limited to 2 uses per 10-second interval:
import discord
from discord import Option
from discord.ext import commands


@client.slash_command(name="clear", description="Deletes a given number of messages.")
@commands.cooldown(2, 10, commands.BucketType.user)
async def clear(msg, number: Option(int, min_value=1, max_value=100, required=True)):
    await msg.channel.purge(limit=number)
    await msg.respond(f"{number} messages deleted.")
The previous command is limited by a cooldown, but it is also nice to add a message to tell the user about the
time until the command is available again.
We will utilize the fact the the CommandOnCooldown
is raised when a user attempt to run the command while in cooldown.
In Pycord, there is function triggered on each error: on_application_command_error. We will plan the case where
the CommandOnCooldown is encountered to answer the user:
@client.event
async def on_application_command_error(msg, error):
    if isinstance(error, commands.CommandOnCooldown):  # Check the error type
        await msg.respond(f"Please wait {error.retry_after:.1f}s")
    else:
        raise error
Sending an Embed
Another interesting feature is to send Embed
.
The first thing to do is to instantiate an Embed() object, then specify its attributes. Here are some, the complete
list can be found in the documentation
:
title: The embed title.color/colour: The color of the embed sidebar.footer: The footer text of the embed.
Some attribute may be given at the instantiation of the object (like title or color), some others can be customized
with their own methods (for instance, footer can be defined with set_footer()
).
An important aspect of the embed are the fields. A field is a line of the embed defined by a name, and a value. To add
a field, the method add_field()
must be called.
Here is an example of an embed containing an image, and a field:
@client.slash_command(name="info", description="Statistics about an user.")
async def my_embed(msg):
    embed = discord.Embed(title="Informations", description=f"Informations about {msg.author.name}.f", color=0x46e32b)
    embed.set_thumbnail(url="https://placehold.co/[email protected]")
    embed.add_field(name="Coins", value="You own 10 coins.", inline=False)

    await msg.respond(embed=embed)
Creatign an Embed may be a burden. There are a lot of website that help you generate some. For instance :
Conclusion
With all the previous elements, you should now have enough knowledge to start the creation of a Discord bot. In the next article, the subject of interactive components will be addressed. It will be about setting up buttons, menus, forms, reactions…
Credits and ressources
Official Pycord documentation : docs.pycord.dev .